Friday, May 18, 2012

Craft #6 -- Bleached tee

I'm nearing the end of my quarter, and I'm so ready for summer.  Hopefully I'll be able to steal my sister's sewing machine and make some of the bigger projects on my board! In the meantime, I'm doing lots of powerpoints and catching up on all of the season finales!

On to my project! I actually finished it a week ago, and have just been putting things off.  It did take me a while to do, however.  In Attempt #1 I used a shirt from JC Penny's that I got for $2. Unfortunately I didn't pay attention to the details in the instructions (click on the picture to see the whole tutorial!).  It was mostly polyester, which I found out is pretty colorfast. Since I couldn't see any color coming up, I kept putting more bleach on and it ate through the shirt! Too bad, since I liked the style of Attempt #1's shirt better than Attempt #2's tank. Ah well. It turned out well in the end.


Basic idea: bleach a design on a shirt! Sorta like reverse tie-dying.
You'll need (non-color safe) bleach, chalk to draw your design with, a synthetic bristle'd paint brush (if you use brushes with real hair bristles they dissolve in the bleach. Again, I didn't read the instructions until afterwards). I used an old sock to catch drips and rest my brushes on,  and of course, you need a cotton shirt. Seriously. Cotton.
You'll also need something to stop the bleach from going onto the back of the shirt. I used a cardboard box the first time, and a telephone book the second time, but I hear you can use a white and/or old towel.

Once you've got that all set up, sketch your design on the shirt with your chalk. If you mess up or change your mind, no worries, the chalk will wash out.

Side note about my quote:
I'm a language nerd. I took a year of Latin my freshman year of college, loved it, and this became one of my very favorite quotes.
 "Si vis amari, ama" is from Annaeus Seneca, a Roman philosopher.  It means "If you wish to be loved, love."

Once you have your design all settled, start painting! It's pretty incredible how fast the color comes out.  As you can see in my finished pictures, I ended up with parts more red and parts more white. I like it, but you can go back over with more bleach if you want it to be more even. 


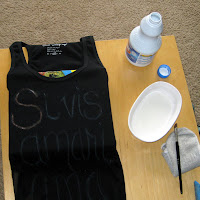
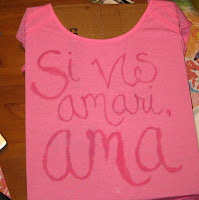
Just to show you the difference between a cotton shirt and my Attempt #1 shirt which was polyester-- you can already see the red/white color on the 'S', while I'd bleached the entire quote on the pink shirt and it just looks damp. 
I recommend getting a smooth shirt versus a ribbed one, though, because I could paint more smoothly on the pink shirt versus the tank. I also had more room, so I like the way most of it looked on the pink shirt versus the black. 

And here's the cotton after I'd done the whole design:


Once I was happy with the design, I let it sit in the window light, since the instructions say to put it in the sun.  After that I hand washed it, just in case. I didn't want to throw it in a full load and have something go wrong and get bleach on all my clothes!  I did throw it in the dryer, and then the next time I did a load of laundry I threw it in.
I'm pretty happy with the way it turned out, but I do want to do it again on a more flow-y shirt. 


There you go, another surprisingly easy project!  Questions or comments let me know. :)


Sunday, May 6, 2012

Just got this color, 'Coral Reef', and wanted to share! Sometimes it seems more orange-y and sometimes more pink-y, but it's the perfect color for spring. and I threw some sparkles on a couple tips just for fun!


Thursday, May 3, 2012

Craft #5-- String wrapped bottles

School has been keeping me busy lately!  So between that and a failed attempt at my next craft, I haven't gotten to post lately. So here's a simple, pretty, and actually fairly quick project for a weekend, or just any afternoon!  I actually had to go and find the pin, I didn't realize that I hadn't actually pinned it myself-- just seen it on my friends' boards. So here is the link to the pin I decided I liked best, but I didn't actually follow their directions. So, here's my version!

Basic idea: wrap a bottle in string. (A lot of my crafts seem to revolve around wrapping things)
I had these little mini glass wine bottles laying around because I thought they would make a really cute something-or-other, and then I used the same blue crochet thread from my other projects-- I had no idea it would come in this handy--and I used white glue, because it was what I had, but if you plan on using these for vases, it might be better to pick something a little less water-soluble.

I didn't peel the label off of my first bottle, thinking that I would just wrap the string really close together and you wouldn't be able to see it.  From far away you can't really tell, but from close up you can see the colors, especially the metallic, so I did peel what I could off of the second bottle, but I didn't spend too much time on it since I was still going to cover it up.
I put a dab of glue where I wanted my string to start, and smooshed it around where I wanted to start wrapping the string so there was a nice thin coating. I didn't want to end up with glue-coated string like from when I made the Easter eggs, but if that is indeed what you're going for, that could be cool too, and check out the craft!

Next step was to wind the string!
I wanted it to be nice and tight and pretty, and the best technique I found was to move the bottle rather than the string. I added more glue as I went along down the bottle, so that it didn't dry before I got there, and so that I had something not-gluey to hold.
I stopped wrapping a little bit before the bottom, just because, and smeared a nice dollop of glue onto it.
And there you go, all done! Easy peasy, you probably have everything in your house already, and it only took me about one episode of Bones to make them, so you have no excuse not to go find some bright spring-y colors and make your mom a trio of vases for Mother's Day! :) 

Questions or comments, let me know!